Demo Version
A demo lets customers try your HUD before buying. The demo HUD must not work on the full product, and the demo item should look like a demo (a "DEMO" overlay, fewer options, or a time limit).
With Demo Mode this takes a few minutes: the demo item is a copy of your product with DEMO in the name, and the demo HUD is a clone of your HUD with one switch on.
Needs scripts 1.2.4
Demo Mode needs the 1.2.4 scripts (or newer) in the HUD and in the demo items. With older scripts, see Without Demo Mode.
1. Clone the HUD
Rez a copy of your finished HUD on the ground. Keep the retail one safe in your inventory.
Drag
*BUILDinto the copy, hold-click it and choose CLONE. A new project, identical to the retail one, opens in the panel.Rename the HUD in Second Life to
… DEMO HUD, so you never mix up the two.
The clone already has every button, action and target of the retail project. Nothing needs to be scanned again.
2. Turn on Demo Mode
In the clone's panel, press Demo in the header.
The confirmation lists the targets the project uses and the name each one needs. Press YES, THIS HUD IS A DEMO.
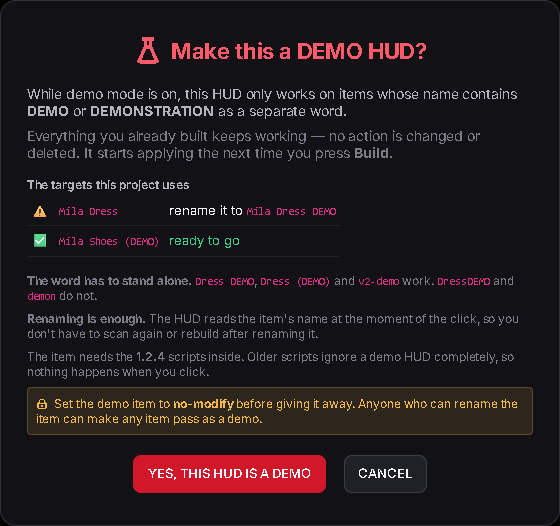
Each target the project uses, and whether its name already works for a demo. Keep the panel open for step 4 before you Build.
3. Make the demo items
Rez a copy of your product. If you want, apply a DEMO overlay texture or bake "DEMO" into its textures.
Rename it with DEMO as a separate word:
Mila Dress DEMO,Mila Dress (DEMO)or[DEMO] Mila Dress. See the name rule.Make sure it has the 1.2.4
*TARGETSinside. The copy already listens to your HUD: if you drop a new*TARGETSin, it says READY! and opens its menu — choose IGNORE, never NEW (NEW gives it a channel the HUD does not know).Set it to no-modify in the permissions for the next owner, so nobody can rename a full item to DEMO.
Selling for several bodies? Do the same with every body version: copy, rename with DEMO, no-modify. Each one works with the demo HUD as long as the name has DEMO in it.
4. Trim the demo HUD
Delete from the clone whatever a demo should not give away:
- Give Items buttons. Demo Mode does not limit them: they would deliver your real items.
- Extra colours or options you keep for buyers.
- Add an Open URL to your store on a spare button, and a Message such as "Get the full version at…".
Then Save and Build.
5. Test
Wear a copy of the demo HUD and the demo item: every button works.
Wear the full item with the demo HUD: nothing changes on it, and local chat says "This HUD is a demo and only works on items with DEMO in the name…".
Wear the demo item with the full HUD: it works. That is on purpose, so buyers can keep using the demo item.
6. Finish and box
Finish! the demo project on its own, like any other project. Box the demo HUD with the demo items.
Keeping retail and demo in sync
The demo HUD is a separate project. When you improve the retail HUD, either repeat the change in the demo project, or clone the retail HUD again and redo steps 2 and 4. With Demo Mode that is a minute of work, since there are no targets to swap.
Other ways to limit a demo
These combine with Demo Mode, or replace it when your product controls itself ($THIS) and has no separate target to protect.
A demo that deletes itself when rezzed, so nobody keeps it around:
Rez event
├─ Message (Owner): "Demo items cannot be rezzed."
├─ Timer 2
└─ Delete Object
A timed demo while worn, with Attach + Timer + Detach:
Attach event
├─ Message (Owner): "Demo: 10 minutes."
├─ Timer 600
├─ Message (Owner): "Demo time is over. Get the full version!"
└─ Detach
WARNING
Add the Rez self-delete last and test with a copy: the Rez event fires when you rez the HUD to build it. See Delete Object.
A trial that expires: the DEMO add-on
[add-on] - DEMO - 1Click (in the Add-ons folder) turns any item into a trial with a time limit, with no project and no Build. It is independent of Demo Mode: use it alone or together with it.
Drop
[add-on] - DEMO - 1Clickinto the demo item's Content.A menu opens once. Set the Time (in seconds; 300 by default) and, optionally, a Welcome message, a Final message and a Texture (UUID) to cover the item when the time is over. To open the menu again, type
/1 demo_configin local chat.Sell or give the item as no-modify, so the customer cannot remove the script.
How it behaves:
- The clock starts when another person becomes the owner. While it is yours, nothing counts, so test by giving a copy to an alt.
- Time only runs while the item is worn or rezzed. The customer is told the time left, and warned at 2 minutes and at 1 minute.
- When the time is over, the other scripts are removed, the texture is applied (if you set one), and the item is detached (worn) or deleted (rezzed). It keeps doing that every time it is worn or rezzed again.
- The settings live in the script: after a Reset Scripts or a new copy of the script, set them again.
Without Demo Mode: a separate demo target
The method used before Demo Mode. It works with any script version, but every demo item has to be set up as a new target.
Show the steps
- Clone the HUD as in step 1.
- Rez a copy of the product, rename it
… DEMO, drop*TARGETSin it and choose NEW. It gets its own channel, so the demo HUD cannot control retail items and vice versa. - In the demo project: Targets → Search for targets.
- Targets → Bulk Edit: current target = the retail item, new target = the demo item. Every action now points at the demo. See Bulk Edit.
- For more body versions, sync each demo body to the demo target.
- Trim, Save, Build, test and Finish! as above.